I’m trying my hand at growing a new food garden in order “walk my talk” and to gain first-hand knowledge of the challenges that my food security, nutrition and home garden students living in tropical countries face in growing food.
I’ve successfully had vegetable gardens in England and in the States—and had a container garden on an apartment terrace for a couple of years until an insect called ‘white fly’ took over. This white fly infestation was my first eye-opener into tropical challenges.
| Organic Material | |
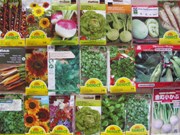 |
I now have a small piece of land (my back yard) to try a garden again—and I’m going to discuss frankly and openly the challenges I face. Three weeks ago in my blog I discussed the importance of getting organic material into my new garden beds. |
|
Challenges Having just moved into this house I didn’t have any organic material. So I ordered composted chicken manure/sugarcane waste. This was my first challenge: they were three weeks late in delivering it and by then the beds were dug so I wasn’t able to incorporate it during the digging process. |
|
| Double-dug raised beds | |
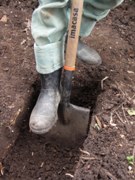 |
The second challenge was that the soil is a heavy clay soil that was highly compacted. It took 6 person days to dig 6, 3′ x 10′ raised beds (1 meter x 3 meters). When the compost arrived I could only layer it on top of the beds, mix it in a little bit into the soil and rake it smooth. This meant that I didn’t get the compost mixed into the soil as well as I would’ve liked. |
 |
Double digging means that you dig out a shovel’s depth of soil, set it aside, and then go down a second shovel’s depth and loosen the soil under the top soil. When you replace the original top soil (and add organic material), the soil is quite fluffed up and the bed will rise into the air 6 to 8″. How-To Card. Gardening Field Guide & Community Based Workshop Lesson Plan in Digging and Planting Raised Beds. |
| The other challenge that I faced in this location for the beds is that the area floods—so we had to dig a channel around the garden area and fill it with stones to drain the area. When it rains during the rainy season (May 15 — October 15) it will rain very, very hard for an hour or an hour-and-a-half—meaning that you have to be very careful with good drainage.
But now, I have moved past those challenges and last weekend I had garden beds ready to plant both with direct seeding (carrots, radishes, peas, beans, beets) and with seedlings that I had started in seed flats a little over a month ago. |
|
| Growing Seedlings in Seed Flats | |
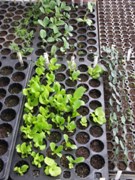 |
Now came my second set of challenges—and that is with the seedlings themselves. Not knowing exactly what was going to prosper, I collected seeds from both England and from the States. I purchased a number of varieties in order to experiment. It’s been very exciting watching the seeds germinate over the past month—but the germination rates were low compared to what I’ve experienced before. A little under half of the seeds germinated. |
| Initially I attributed this to a two-week cold spell that we experienced a week after I planted the seeds.
Investigating Poor Germination For example, I purchased two different sizes of inexpensive plastic, 12” x 20”, reusable seed flats. One size has 38 plantings cells that are 2 ¼”diameter and 4 ½” deep; the other size has 105 planting cells that are 1” in diameter—and 1 ½” deep. I sorted my Excel spreadsheet by the seed company and couldn’t find any single company that had greater or lesser germination rates. I then sorted my Excel spreadsheet by the size of the flat’s cells. Interestingly almost 60% of the seeds in the larger cells germinated and less than 25% of the seeds in the smaller cells germinated. So I’ve decided to replant the seed varieties that did not germinate—and use the larger seed trays this time. |
|
| Seedling Plugs | |
|
Over the years I’ve also had great success starting seedlings in seed flats/trays and creating what are called ‘plugs’. I fill the conical shaped cells in the seed flats with peat moss and plant one seed in each. I usually plant 7 to 15 seeds for each variety—and then I carefully label each row with the variety and the date using little strips of plastic cut from plastic yogurt tubs and an indelible marker. After four or five weeks many of the seedlings are 1 ½” to 2” tall. The larger seed flats work well for an additional reason. The seed flats are designed so that you can push up on the peat moss from below and out pops a conical shaped peat plug—with all of the peat moss neatly held together by the seedling’s root system. |
|
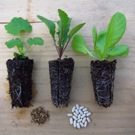 |
This means that you can easily handle the individual plugs without damaging the seedlings. It also means that the seedlings arrive at a planting bed with their own starter soil rather than being placed bare-root into soil new to them. |
|
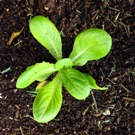
This buffers acclimatization time and protects the roots from damage. I simply make a hole with my hand in the planting bed and set a plug into the hole. I make sure that the plug is inserted deeply enough such that little seedling is well supported by the surrounding soil in the new bed. During the planting process I made a map of the newly planted beds because I purchased so many varieties of seeds that I do not want to get them mixed up so that I lose track of which ones perform best. So right now I have 6, 3′ x 10′ beds planted with the variety of the seedlings and seeds which you can find on my Excel spreadsheet. I’m feeling pretty good about this because I’ve only been in this house for about six weeks and I already have a small garden. |
|
 |
I also had about 20 planters left over from the terrace in my apartment and I’m using them on a terrace outside of my kitchen for a kitchen herb garden—and also on a sunny south facing terrace where I’m trying about a dozen different types of pepper plants—both spicy ones and sweet ones. I love cooking spicy meals from a range of countries—many of the countries that you live in! Please send recipes! |
The first challenge that I’ve run into with my newly planted seedlings has been that some bird or animal is clipping leaves off some of my lettuce and cabbage seedlings—and not eating them—just leaving them lying there. My friend Ricardo Frohmader feels they are just sampling to see if anything is worth eating; after they discover that there isn’t anything worth eating they will leave the plants alone. He has also suggested buying a couple of rubber snakes and a plastic owl to discourage them from entering the planting area!
I’ll see you next week in a discussion about sharing seeds among friends in order to have fun, increase food diversity and save money.
What’s happening with food gardens in the region where you live? Is there specialized information that you would like us to write about?
Please post your comments to our blog, or to our Facebook page.
Learn how to develop a non profit, impact oriented project.
Like us: CSDi Facebook.
Until next month,
Tim Magee
